Login to multiple Skype accounts via shortcuts
Scenario
You have more than one Skype account and need to be able to login to both accounts simultaneously.
Solution
- Navigate to the Skype folder. Usually something like: C:\Program Files\Skype\Phone
- Right click on Skype.exe > Click Create shortcut. If necessary save the shortcut to the Desktop
- Right click on the newly created shortcut > Click Rename and give the shortcut an appropriate name (e.g. Personal)
- Once again right click on the shortcut > Click Properties and enter the following into the Target field, changing USERNAME and PASSWORD for your Skype username and password:
"C:\Program Files\Skype\Phone\Skype.exe" /secondary /nosplash /username=USERNAME /password=PASSWORD /legacylogin
***Note – Make sure this is pasted without any line breaks
/legacylogin is only necessary for Windows XP and Vista
- Change the Run field to Minimized
- Click Apply and then Click OK
- Repeat the process above for any other Skype accounts you have
- Finally, right click on each of the shortcuts created and Click Pin to Taskbar
- Your shortcuts should now be operational
Understanding the Target command
“C:\Program Files\Skype\Phone\Skype.exe” /secondary /nosplash /username=USERNAME /password=PASSWORD /legacylogin
The first part of the command is the full path to the Skype programme and must be surrounded with inverted commas.
The first command option is /secondary. This option allows you to open an additional instance of Skype.
The second command option is /nosplash. This option prevents Skype’s splash screen displaying on start-up.
The third command option is /username. This option allows you to set your username.
The forth command option is /password. This option allows you to set your password.
The fifth command option is /legacylogin. This option has become necessary since Skype 5.5.0.113 on Windows XP and Windows Vista
Forcing Google Chrome to use google.com
Here’s the scenario. You don’t live in the good old U.S.A., but you do want Google Chrome to use: google.com for your searches.
The solution
- Open Google Chrome
- Click the wrench icon (top right hand corner)
- Click Options
- Click Basics (left hand column)
- Click Manage Search Engines
- In Other search engines add the following (there are 3 fields)
Field 1 – Add a new search engine: Google USA
Field 2 – Keyword: google.com
Field 3 – URL with %s in place of query:
http://www.google.com/search?{google:RLZ}{google:acceptedSuggestion}{google:originalQueryForSuggestion}sourceid=chrome&ie={inputEncoding}&q=%s
***Note – Make sure this is pasted without any spaces or line breaks - Click Enter to save the URL
- With the mouse, hover over the new entry that you’ve just created and click on the Make default button
Thunderbird – Changing email headers
UPDATE: I’ve found a new extension which is working well for me. It’s called HeaderToolsLite and you can get it here: HeaderToolsLite.
Years ago a great little extension called TB Header Tools was developed that allows you to change the email headers when using Thunderbird. This is great for when someone sends you an email without a subject line. I really wish this functionality was native to Thunderbird, but it’s yet to appear as a feature.
Unfortunately the TB Header Tools extension hasn’t been updated for years, so the official version is all but useless. However, where there’s a will there’s a way. Here’s how I got it working again in Thunderbird 6.
How to fix TB Header Tools to work with Thunderbird 6
Dowload the extension from here:
Add-Ons Mirror
Here’s a direct download link to the extension:
TB_Header_Tools_0.7.1-tb3.xpi
Decompress the xpi file with 7zip
You can get 7zip here:
http://www.7-zip.org
Using Notepad++ or similar, open the file:
install.rdf
Change the line:
<em:version>0.7.1</em:version>
to…
<em:version>0.7.2</em:version>
Change the line:
<em:maxVersion>3.*</em:maxVersion>
to…
<em:maxVersion>6.*</em:maxVersion>
Using 7zip, compress all the files using Archive Format set to ZIP and save the file with the following filename:
TB_Header_Tools_0.7.1-tb6.xpi
Install to Thunderbird 6 and all is well.
One gotcha. It turns out with this extension installed Junk is no longer automatically sent to the Junk box. I can live with that though.
Usage
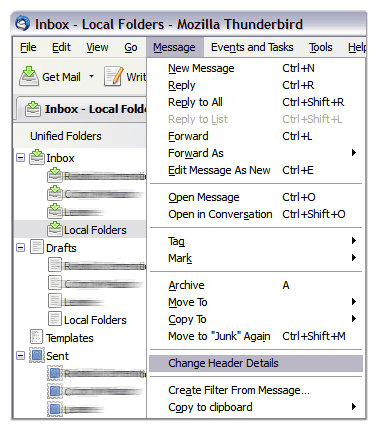
Highlight an email message
Go:
Message > Change Header Details > Add or Edit your header > Click OK
That’s it – you’re done.

TB Header Tools is still occasionally discussed over at Get Satisfaction in this thread:
Get Satisfaction – Can I use thunderbird to rename a subject line in a received email


